How to Replace Data without Merging

As you work with Infusionsoft, you'll likely run into scenarios where you need to add some tags to a sub-set of contacts in Infusionsoft but that set of contacts is defined externally and all you have is their email address. This happens a lot.
The Scenario
One common scenario where we see this happening is with merging data between an external system and Infusionsoft – many times a webinar platform or 3rd party shopping cart.
You've got nothing more than a list of emails sitting in a CSV file. These contacts already exist in your Infusionsoft app, but you just want to tag them.
What most will do is is “import” these as new contacts and then go through the merging process. Now that works fine for many cases, but if you're dealing with large lists of contacts, this can be very time consuming. You also open up the can of worms that is the “merging” process – many times with less than desired results.
What We Do…
Instead of merging the contacts, simply replace the contact data. Here's the catch though, we're really not even going to replace or overwrite any data! Instead we're simply going to “hack” the system into letting us apply a tag for a list of contacts.
STEP #1 – Export IDs & Emails
Now, I know this seems odd. We're updating data in Infusionsoft and I'm asking you to “export” – but trust me, this is easy and works well. What you do is a simple search and select all contacts and then click the export option for the Actions menu. That's right, we're gonna export ALL of your contacts.
Here's the trick though, you only need to export two fields for each contact – the email and the Infusionsoft Contact ID. So, while you may have 100k contacts, even so, this is super fast (I just did this trick this week on a list of over 250k).
Remember, just export only the ID and Email columns.
STEP #2 – Getting Down & Dirty with Excel
Now what we need to do is translate our single column list of emails only into a 2-column list of emails and IDs. The way we do this is with Excel or Numbers (on the Mac). For simplicity, I'm going to show you how to do it on Excel, but this will also work with Numbers. Even though I use a Mac, I use Excel.
The reason is that when you deal with large spreadsheets, Numbers just can't deal with them very well. Excel, however, can work with huge datasets without a problem (gets a little slow, but it still keeps chugging along).
The specific function we want to use in Excel is VLOOKUP. If my quick tutorial here doesn't cut it for ya, search on YouTube or in Google for EXCEL VLOOKUP TUTORIAL and you'll find about a 100 better ones. But the point of this example is just to get you the broad strokes. If you need more detailed help, look for a more detailed VLOOKUP example.
What VLOOKUP does is looks up a value in a separate table/sheet and translates it to a key. So, for example, if I have 1000 emails and need their IDs in Infusionsoft (our scenario), I will simply use the exported 2-column list of emails and ID's as a “lookup” table.
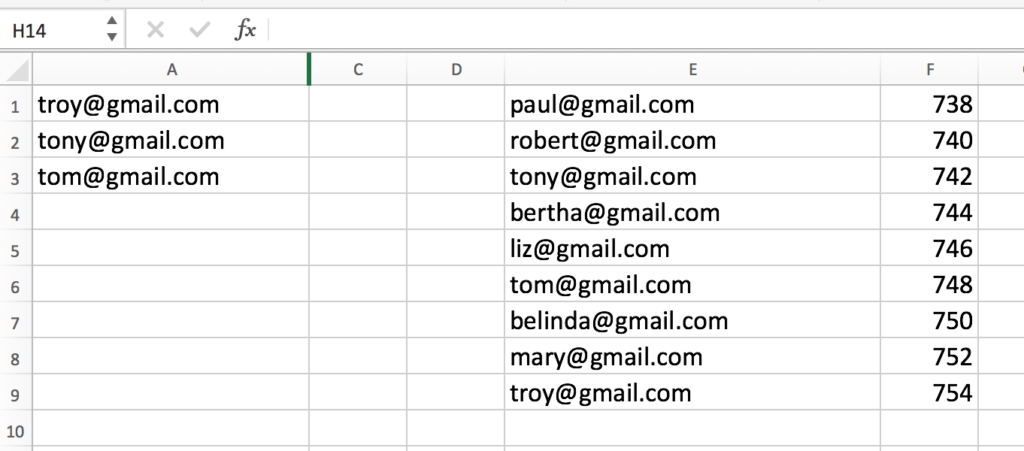
Let's take a look at some sample data. For fun, I've used the all too common ways people refer to my name (seems Troy is tough – I usually get “Tony” or “Tom” – lol). Now you'll likely have this data on two separate sheets / tabs in Excel, but for simplicity in illustrating how this works, I've just put the data in adjacent columns.
On the left we have our single column list of emails. On the right we have our “lookup” table which has our export file of emails and contact ID's. Remember, the goal here, is to get the ID's for our (short) list of emails on the left.
Now, after we use the VLOOKUP function, here's what the results look like:
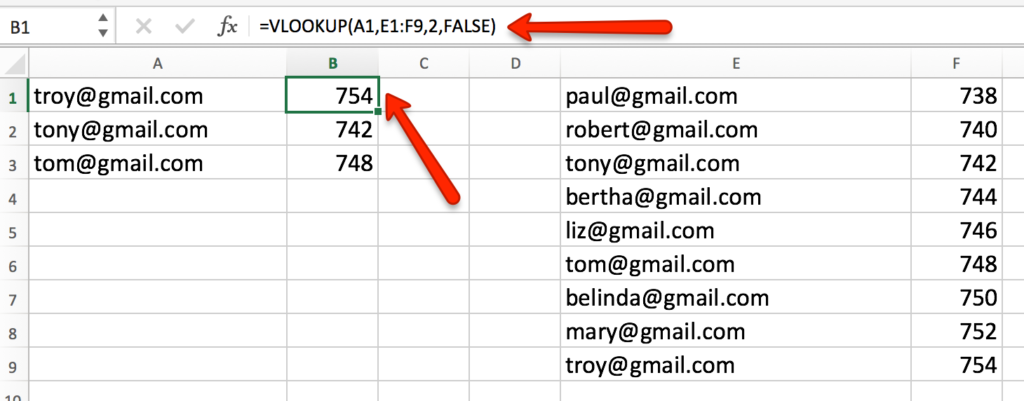
In case you can't see the code well in this image, here's what we use for the VLOOKUP formula in cell B1:
=VLOOKUP(A1,E1:F9,2,FALSE)
So let's dive into that syntax a bit.
The first parameter “A1” tells Excel the “source” value that we want to want to lookup. Since we're using the email list on the left, we simply put cell A1 here.
The second parameter “E1:F9” defines the range of the lookup table. Now, like I said, generally this will be on a separate tab/sheet in Excel. But that's not a problem because formulas can span multiple sheets/tabs. The easiest way to do this is to just build the formula by clicking on the region and letting Excel put in the values.
The third parameter “2”, tells Excel which column in your lookup table you want to return. So, for example, our lookup table has two columns – email and ID – and I want the second column (the ID), so I use “2” as the value here.
The last parameter is designed to screw you – lol – so be ware. But seriously, this one simple word, has bit me in the nether regions a few times! The reason is that if you don't use the word “FALSE” it will do an inexact lookup. That means that it won't match on the exact email, but just some part of the email. This will, obviously, yield disastrous results! So if your translated ID's all look the same, or lots of duplicate values, this is likely the mistake you've made (ask me how I know – lol).
Using Named Ranges
That's really all there is to it in Excel. Using the above VLOOKUP code, you'll quickly and easily be able to translate even very large lists from just Email to Email / Contact ID pairs.
STEP #3 – Putting it Back Into Infusionsoft
Now when we go to put this back into Infusionsoft we have to be very careful. We're NOT going to use the Import method, I'm gonna show you another approach. But it's super important that you pay close attention to what you're updating as I take no responsibility for your mistakes and you can update 100's of thousands of records all at once if you're not very careful.
You've been warned.
What we're going to do now is export a single column CSV file from Excel that only contains our newly looked up and verified Contact ID values. So, in the example above, I'd copy column B onto a new sheet and just export that single sheet.
Use 'Paste Values' Option
Then you would simply export that single column list of ID's as a CSV file to load into Infusionsoft.
Now, as I said, we're NOT going to import these records in the traditional way. Instead, we're going to use the Modify Existing Records method. To do so, go into the Admin menu and select Data Cleanup. After you do, you'll see the Modify Existing Records option as the first option on the page.
It will bring you to a familiar screen – similar to when you go through and import – but there is one very key and super important difference. When you do an import, Infusionsoft creates new contacts (even if there is an existing one with the same email). But we're not importing, we're REPLACING DATA – make sure you read that three times!
So when we upload the list of ID's and match it to Infusionsoft Contact ID field, we're not actually going to change any data at all. Take a minute and think through this. We're only using one column and it's simply the “match” column, so no data will actually be saved anywhere…
…so how does it work?
Well, after you match the single column, you'll be given the ability to run actions after the data load process and HERE IS WHERE THE MAGIC HAPPENS! Now we can add a tag and it will only be applied to those records that we are matching in the data update process.
Summary
It may seem like a long way around the mountain, however, I can tell you that after you do this a couple of times, the entire process takes just a few minutes and is very powerful. You'll be able to take any list of contacts, identify them in Infusionsoft and tag them appropriately WITHOUT having to do any data merging or manipulation of your contacts at all. Pretty sweet, huh?
Make sure and subscribe below for more great tips like this every Tuesday!